Ceramic Tile Care and Maintenance

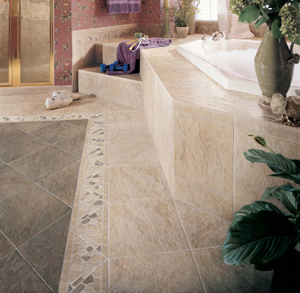
Glazed ceramic tile is known for its durability and the variety of colors and designs. Ceramic tiles are purchased in dye lots that have the same texture and color. Because an exact replacement match of ceramic tile can be impossible, we urge you to take special care to avoid breaking or damaging the ceramic tile. Ceramic tile is brittle and can be broken by a sharp blow from a heavy object. Take our advice and save all unused tile that you were given for future repairs. You’ll thank us later!

Tile Cleaning: Warm soapy water, a detergent or a commercial tile cleaner can be used to keep your tile bright and shiny. See manufacturer recommendations for recommended tile cleaning products.

Grout Cleaning: Because the grout between the tiles is porous, you may want to consider sealing the grout once a year or so. This will prevent stubborn stains from penetrating the grout and becoming unsightly. Wipe spills away promptly to avoid staining the grout. Routine scrubbing of the grout with warm soapy water will keep it clean and fresh. Cleaners that are to strong can stain the grout. See manufacturer recommendations for recommended tile cleaning and sealing products. Sealers and cleaners can be found at your local hardware store.

Grout Sealing: Water can penetrate grout seams and joints, and will damage materials adjacent to and underneath the tile. This occurs when excessive amounts of water are used during floor washing, or in the bathroom from splashes and spills from the showers, tubs, and sinks. The grout installer applies a silicone based grout sealer prior to close of escrow to reduce staining, mildew, and water penetration. See manufacturer recommendations for recommended tile cleaning products. See manufacturer recommendations for recommended tile sealing products. Grout sealers are available at hardware stores and should be used following manufacturers guidelines.

Seams and Joints: The seams and joints are not waterproof, and require proper maintenance to prevent water seepage and damage of materials adjacent to and underneath the tile. Inspect these areas frequently and apply a silicone caulk to the joint as needed.

Note: Fulton Homes cannot ensure that ceramic tile repairs requiring new material will match the color of the existing tile material or colored grouting. Color variations are normal.


Posted in Uncategorized

Stages of Construction: Stage 3

Today continues a series about the stages of construction. Our goal is to help you understand the stages of construction, learn about how we do things and what you can expect during each stage. In this series, we will cover 5 additional stages of construction. To see the previous stages of construction, click here.

Stage 3

Introduction

In Stage 3, the rough mechanical work for the heating and air conditioning systems “HVAC” is completed and plumbing pipes, electrical wiring and low voltage wiring are installed. The roof dry-in is completed and the exterior walls are covered with a moisture barrier wrap prior to stucco or siding installation. Foam lathing & wire are then installed. The Phase II Pre-drywall Meeting with the homebuyer is also scheduled at this time.

The process of installing the mechanical “roughs” begins once the shear inspection is passed. The HVAC (heating, ventilation, and air conditioning), plumbing, and electrical roughs are installed in order. Once the HVAC and plumbing roof penetrations are completed, the roof dry-in will be performed.

Plumbing lines, waste lines, and gas lines are installed within the interior wall studs prior to drywall. The plumber will install the waste lines first, water lines second and gas lines third. All plumbing lines, tubs and shower pans are put on test for any possible leaks. This test is also inspected by the local municipality building & safety inspector. The roof penetrations for the plumbing vent lines and HVAC are cut before the roof is papered or “dried in.”

The electrical roughs will begin after the HVAC and plumbing roughs are complete. All low voltage wiring is installed after the mechanical and electrical roughs are complete. Variations in framing due to a variety of reasons may cause standard phone, cable or electrical locations to vary slightly.

Typically, utility trenches are dug after the electrical rough-in is completed. These trenches are then inspected for proper location, depth and distance for gas, water and electric. The various conduits and utilities are then installed. Please keep in mind that rainy weather conditions can delay this process .

The roof dry-in is the process of installing a roof felt cover and battens. Battens are wood cleats that roof tiles sit on. This can be done only after the roof sheeting has passed shear inspection as well as the completion of all plumbing and HVAC roof penetrations. Once the roof is dried-in, the installation of the HVAC will begin The HVAC includes all ducts, vents, and furnace installation. The HVAC contractor also installs flashings as needed.

The exterior walls are covered with a moisture barrier wrap prior to lath, stucco and siding installation. The installation of exterior siding or pre-stucco lath typically takes place after the plumbing, HVAC and electrical roughs. Once the gutters, roof flashings and paper are installed, the siding or pre-stucco lath will go up on areas above the roofline.

The installation of exterior pre-stucco lath and wire is next and must be inspected and passed by the local municipality building & safety inspector before stucco is applied.

As you can see, a great deal of coordination and cooperation is required from every trade partner involved at this stage. To keep on schedule the finish materials for the home will need to be ordered in advance.

A frame inspection is required after roof tile is loaded, siding and pre-stucco lath, plumbing, HVAC, and electrical roughs are complete. Again, all rough mechanicals including plumbing, HVAC, electrical, lath materials and hardware are inspected by the local municipality building & safety inspector and your Fulton Homes Project Manager. During this phase of construction the Fulton Homes Phase 2 inspection is performed by your Project Manager for proper installation of your options and all other work performed.

In a case where an extensive network of audio/ visual or computer wiring is to be installed, you will be scheduled to meet with the low voltage wiring installer to confirm the lay out and locations of your chosen options. This meeting will be scheduled before the pre-drywall meeting with your Project Manage. Please note: this is a critical appointment.

Next, after all of the Stage 3 items are complete, you will be asked to attend a pre-drywall meeting with your Project Manager to review your home. Your Sales Associate will schedule this appointment with your Project Manager. This meeting is a good opportunity to review the entire home. At this meeting, the homeowners and Fulton Homes will compare paperwork for errors or omissions and discuss all options and upgrades.

This information is provided simply to give you a better understanding of what to expect. Feel free to just sit back, relax and be Proud to Own because we are Proud to Build for you!

Posted in Uncategorized

Air Conditioning Tips

Your heating and air conditioning systems can play an important role in the first year after you move in. Did you know that  by maintaining an even temperature, you can minimize the contraction and expansion of the materials in your home?

The following suggestions are intended to assist you in getting the maximum usage and enjoyment from your heating and air conditioning system:

  1. We recommend that filters be changed every 30 days or as needed. In areas with heavy dust more frequent changes may be in order. Fresh filters can significantly reduce operating costs and will prolong the life of your system.
  2. Check the operation of your system well in advance of peak operating seasons. Notify the appropriate subcontractor of problems before seasonal service demands are the greatest.
  3. Keep all vents and registers clean and free of dust, cobwebs and debris.
  4. Keep plants and grass trimmed well away from the outdoor unit.
  5. Keep the condensing unit relatively level and keep the area surrounding the unit clear to allow unimpaired airflow. Do not plant bushes near the unit and be careful that dirt, leaves, and grass clippings are cleared away. For a thorough cleaning, contact a licensed HVAC Contractor.
  6. We hope this tips help you get the most out of your air conditioning system! Enjoy the summer and stay cool!

Posted in Uncategorized

Foreclosure Considerations Question

Reader Question:

Is purchasing a foreclosed property really the best idea right now?  Shouldn’t we hold off and see what the market does?  I would have to think some cities are coming back quicker than others, but how about our country as a whole?

Answer:

There are many factors to consider when looking at a foreclosed property. Here are some questions you should take into consideration when considering a foreclosed home:

* What type of shape or condition is it in?
* What is the neighborhood like?
* Are there other foreclosures in the area?
* How much would it cost to bring it up to a livable condition?
* Are there signs of mold?
* How about energy efficiency?
* What is the SEER rating for the AC system?
* Does it have dual pane low-e windows?
* It is Energy Star qualified?  (A home build ten years ago would require about double the energy costs of today’s new Energy Star home.)
* What type of warranty does it have?

Consider the answers to these questions before purchasing a home in foreclosure. If you have additional questions, feel free to leave us a comment.

Is purchasing a foreclosed property really the best idea right now?  Shouldn’t we hold off and see what the market does?  I would have to think some cities are coming back quicker than others, but how about our country as a whole?

Posted in Uncategorized